|
Page Layout
|   |
|
Page Layout
| |
DISC INITIALIZATION - Page Layout
Place a disc in the drive, close the drive (manually or using the icon) and wait for the initialization process to complete. The initialization progress can be monitored by watching the Test Status Area at the bottom of the screen. The length of time it takes to initialize a disc can vary dramatically and is dependent on the number of test features chosen in the program setup group. The following screen is an example of the initialized screen for a Mixed Mode CD with ISRC detection turned on. .
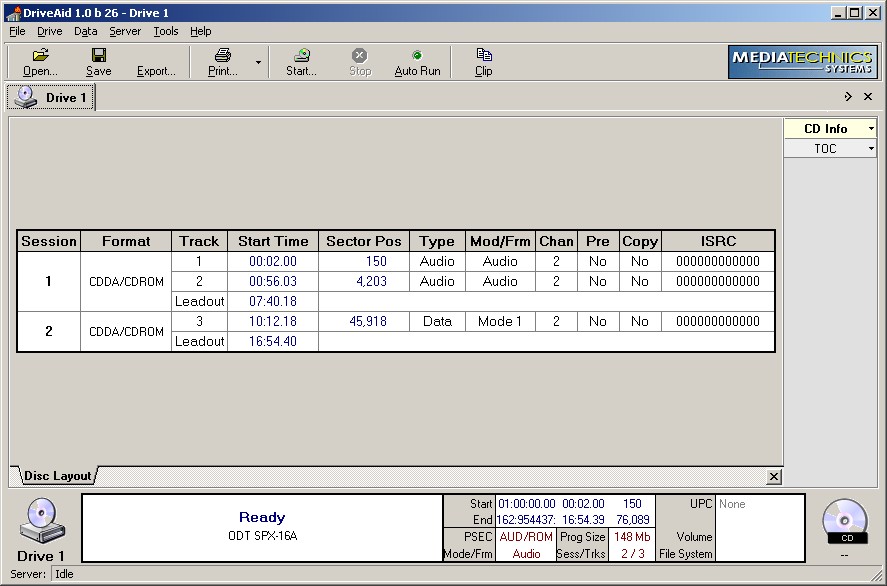
CD Mixed Mode Initialization Screen
Initialization Screen - formatted for all analyzer operations and can be separated into 3 distinct areas.
Test Status Area - the area between the two disc Icons in the lower part of the screen. It will show the status of the disc and the drive at all times before, during and after an analysis.
Test Information Area - is just above the Test Status Area. The folder tab at the top of this area will initially contain the drive number. This label will change into the test title at the start of an analysis operation other than initialization logic. The information area can contain Error Response, Real-time Graphs and Disc Logic.
Test Operations Area - can be found at the top of the page just below the file functions. There are 8 Operation buttons above the information area in this release of the software. They are Open, Save, Export, Print, Start, Stop, Auto Run and Clip. These are the most common operations in the use of this analyzer. The first letter of each named ICON is underlined signifying a windows “Alt” key or hot key operation. Using the “F5” key on the keyboard can access the Start/Stop operations.